So back a few weeks ago, when I played Alpha Strike with Dave, I learned that Alpha Strike has an optional rule that is, effectively, Infinity’s Silhouette rules, wherein every model of a particular type has a specified volume which can be substituted for the actual model. This offsets the tendency of models that are intended to be about the same size but often have wildly different poses and shapes, which can make Line of Sight… strange.
I think these rules, particularly Infinity’s implementation of them (of course), are Necessary and Very Good.
Alpha Strike doesn’t have a specific Silhouette stat per se, but if we look at the table:
Practical Line of Sight Size Table – Alpha Strike Commander’s Edition pg 171
That table reduces down to 5 categories:
s
Shape
Description
0
1″x1″
ProtoMechs (All)
1
1″x1.25″
Infantry (All) Combat Vehicles (1-4) Support Vehicles (1-3)
2
2″x 1.25″
BattleMechs (1-4)
3
3″x1.5″
Superheavy ‘Mechs (4+LG)
4
“It’s complicated”
Support Vehicles (4+)
So, of course, I doodled up some S markers for these.
I’m not deep into Battletech, and Catalyst isn’t making Protomechs in plastic, so I’m not going to worry about them (that’s why I started numbering at 0). Support Vehicles 4+ defy a simple shape (seriously, there’s a 15 item table with footnotes to cover them and there’s “use model” in the main table), so I’m not worrying about them.
Honestly, S1 and S2 are probably the only ones I’d ever see on the table, but it’s convenient for me to have the S3.
S1 and S2 are magnetized, so they can snap together, and they fit comfortably inside of the S3. I can just tuck them in or I can set the S2 on an A-Case tray, the S1 on top of it, and the S3 on top of them both, and they should be reliably stay where I’m asking them to: even though the S3 isn’t sticking to the tray, it’d have to slide up the 2″ length of the S2 to fall off and in the meantime is holding the S1 in place.
Printed these at .2mm layer height with organic supports. I ironed the topmost layer, but I suspect that made the text less legible. If you use supports, I recommend a support blocker covering the magnet holes on S1 and S2; support material isn’t needed for a 6mm gap and goes a long way towards making those magnets maybe probably not fit properly. Use 6mm x 3mm magnets.
I’ve got a tub of magnets. They’re random, from God only knows where. I don’t know their sizes, strengths, or what to do if I need more of a particular kind.
So, a couple of years ago, I broke out the calipers, did some planning and (most importantly) took notes. Now, I keep these magnets in a tacklebox, separated and labeled, with appropriately wide drill bits.
All of these are sourced from Amazing Magnets. you can probably get the same sizes from other vendors like K&J Magnetics, but I vastly prefer AM because they list sizes in both metric and, where they list Imperial sizes they use decimals instead of fractions. So: these are the AM item codes.
(Let me take a moment to express the hate I feel for defaulting to fractional Imperial measurements for this shit. Fuck off with this 1/32″ shit.)
If it’s useful, here’s my chart:
Code
Diameter
Thickness
use
R094-094
2.38mm
2.38mm
Small plastic bases
D032A-N52
3.18mm
0.79mm
Warmaster bases
D094A1
3.97mm
2.38mm
GW Bases
D063A1
3.97mm
0.97mm
Padding for D094A1
D032A1
3.97mm
1.59mm
Padding for D094A1
D063A2-N45
4.76mm
1.59mm
Infinity bases
I also have some magnets that are perfect for the hole in Necromunda bases, but somehow I failed to correctly note them. My notes say “D063A” but that’s not right: those are 3.18mm wide but the magnets I have are 2.9mm wide.
Small, light minis will get R094-094s. Most of my minis get D094A1s, which are just the right depth for GW bases, and I supplement them with D063A1s (which are ~1mm deep) and D032A1s (which are ~1.5mm deep) to help get the needed depth if ~2.4mm isn’t deep enough.
Elsewhere, I was lamenting a general, pervasive lack of effective technical writing. It’s something I deal with professionally and, uh, it’s frequently an issue encountered with rules writing. It is vital to be able to communicate complex concepts clearly and effectively. I know folks who have Masters degrees in it (I am not one of them).
Anyway, that Kill Team Balance update came out, and I complained about it, because I think it’s an example of this. It could be less clear, but it’s not perfect. And really, maybe that’s OK: when you design a game where ▲ = 1 and ■ = 3 you’ve made an active, conscious decision to reject clarity.
I’ve been converting up Genestealer Cults Enforcers while we watch Inventing Anna, and doing it with the idea of running them in Kill Team has given me some guardrails. Unfortunately, although I think Kill Team list construction is Really Good the way it’s expressed is Really Not. Some of the rules read like they’re an eight year old telling you about Minecraft: just a stream of consciousness ramble modifying everything that’s already been stated.
Which is how I ended up reformatting the GSC KT list construction rules, which I figured I’d reshare here:
BROOD COVEN KILL TEAM
A BROOD COVEN kill team must contain consists of 2 fire teams selected from the below lists:
NEOPHYTE HYBRID
ACOLYTE HYBRID
HYBRID METAMORPH
(1) LEADER operative must be selected from one of these fire teams.
(0-1) ICON BEARER operatative may be selected from one of these fire teams.
Options indicated as UNIQUE are limited to 1 instance across the entire Kill team.
NEOPHYTE HYBRID FIRE TEAM
ARCHETYPE: SECURITY / INFILTRATION / RECON
(7) A NEOPHYTE HYBRID fire team includes 7 NEOPHYTE HYBRID operatives selected from the following list:
(0-1) NEOPHYTE HYBRID LEADER equipped with one of the following options:
Gun Butt and either Autogun or Shotgun
One Option from each of the following:
Chainsword, Power Maul or Power Pick
Autopistol, Bolt Pistol or Web Pistol
(0-1) NEOPHYTE HYBRID ICON BEARER
(2-7) NEOPHYTE HYBRID TROOPERs each separately equipped with a Gun Butt and one of the following options:
Autogun or Shotgun
(0-2) NEOPHYTE HYBRID GUNNERs each separately equipped with a Gun Butt and one of the following:
(UNIQUE) Flamer
(UNIQUE) Grenade Launcher
(UNIQUE) Webber
(0-1) NEOPHYTE HYBRID HEAVY GUNNER equipped with Gun Butt and one of the following:
(UNIQUE) Heavy Stubber
(UNIQUE) Mining Laser
(UNIQUE) Seismic Cannon
… and so on. There are Acolyte Hybrid and Hybrid Metamorph Fire Teams that follow the same pattern… but I think the Neophyte rules are the hairiest and prove the point.
This doesn’t change anything from the actual creation rules, and it’s probably not perfect… but I think it’s an improvement.
It collapses the Gunner and Heavy Gunner options into single entries each: it doesn’t make sense to me to give each variant their own entry in some cases but list them as options in others…. especially when they all refer to the same profile.
This is also important because there are rules that govern selection of the profile, not the loadout.
It pulls the breathless, run-on paragraph about those rules in-line with the other list construction rules. You can see how many of what options you can take instead of having to look at the list to see the entries, look at the paragraph to see what the constraints are, then back to the list to see which entries you can’t take.
Enumerate options. If you can take up to two: say 0-2. If you’re going to have to have minimum 2 of something, say that: 2-7.
I’m using digits instead of text numbers in most places. I probably should be fully consistent with that, but am not.
The “you can only take one of these per Kill Team” rule is pretty common. I know that GW’s current design rejects USRs and emphasizes rewriting rules as many times as they need to reference it, but I think that’s bad. Why repeat yourself like that, and why not make it clear that this constraint applies to the Kill Team and not the Fire Team (which are terms that are similar enough to only help this be confusing). So: the “UNIQUE” designator.
The constraints about only being able to take one LEADER is best expressed in the context of the overall Kill Team, not the Fire Team. Ditto ICON BEARERS. You could almost use UNIQUE on these, but if you simply relied on it you’d be able to take a NEOPHYTE HYBRID LEADER and an ACOLYTE HYBRID LEADER.
I capitalized the equipment names. They’re in-game terms, so I don’t think they should be lower-case.
Man “Gun Butt” is in there too many times. Be nice to just nuke that and return to a default melee weapon. Too many butts!
I’m not a technical writer or a game designer… but I think this is a significant improvement over the readability of the as-published text.
I live in the Commonwealth of Virginia, in the suburbs around Washington, DC… and it’s freaking humid here. It’s not the most humid place I’ve lived (I used to live in South Texas), but it’s a certainly a notable feature of the area.
Something I hear (read, really) is “I’m waiting for better weather so I can go out and prime my models.” “It’s too humid to prime.” “It’s too cold to prime.” Primer doesn’t love humidity or low temperature, so if it’s cold or damp outside you can’t prime (or varnish) outside. You can’t spray aerosol primer (or varnish) inside because it’s toxic. What’s a hobbyist to do, besides just wait for a good day before they start a project?
This drives me nuts. It does’t have to be this way. Folks’ hobby velocity is stopped up waiting on optimal weather and it doesn’t need to be.
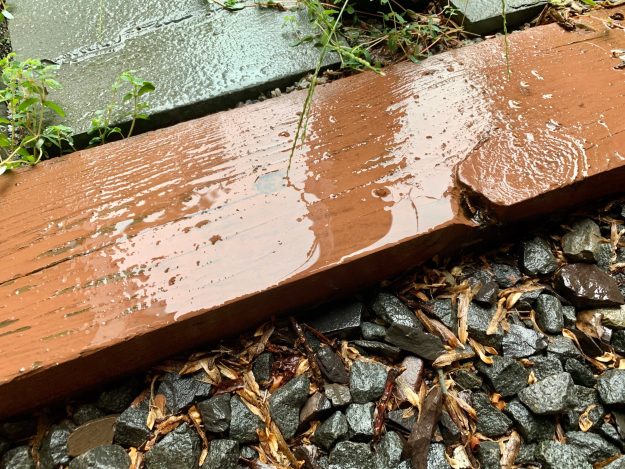
Keep your models and spray inside. When it’s time to spray: take everything outside. Spray your models outside, where the spray won’t poison you. Put the sprayed models into a tub, and put a lid on it. Bring the tub inside. Let stuff dry. Do this year-round.
So: I’ve switched over to airbrush priming pretty exclusively, but pretty much every model I primed from the beginning of this blog until 2015 or so was rattle-can primed outside in all weather and tub’d. Every model I have varnished in the past 15 or years years has been varnished outside in all weather and tub’d. If you want to see the impact of weather on my priming and varnishing, skim through my painted model photos.
The photo examples I have were just after it’d stopped raining: I’ll spray in the pouring rain, even, just not where raindrops will hit the model I’m spraying. The air was thick with wet after a rain.
This is my tub. I cracked it, so just duct taped-over where the plastic shattered.
I’ve also got a grotty piece of foam that I keep in it to hold my minis in place; I don’t want them whacking into each other while they’re drying.
I stick my dudes onto old Dullcote caps and empty P3 paint pots to hold while spraying.
“That’s varnishing, though” you might say. “I was talking about priming.” Fine. I grabbed a mispacked ASOIF Free Folk and primed him with a GW Wraithbone rattlecan. Note the lack of pebbling.
Here’s the model washed to help make the lack of pebbling more clear.
That’s it! You don’t need to wait for a perfect day that’s not too hot, not too cold, not too dang humid. Just spray your stuff and put it in a tub. Don’t let not great weather prevent you from painting your minis!
My primary coping mechanism during this pandemic has been to plan for all the gaming I’m going to get to do if it ever blows over. One of my current plans is try my hand at a Necromunda campaign in my basement.
I’ve got Sector Mechanicus covered with the Deadzone terrain (which I’ve expanded on since that post during the halcyon days of 2014), but the table in my gaming room (constructed in November and un-posted about here; I should fix that) is 6’x4′, which doesn’t leave enough room for 2 4’x4′ tables (I’d have loved to have made it larger, but this is as big as the space permits). That’s a problem if I want to have 2 games/time.
I got the Underhive box when it came out, so I’ve got Zone Mortalis tiles, which solve the problem. I’ve got room for 2’x4′ worth of tiles; more if I shrink the Deadzone table down to a 3’x4′ or so. The tiles have walls marked on them, and the thing to do is to build some MDF or print off some walls to make them feel more real. Cool.
I did some waffling between the offerings from Warlayer and Corvus Games Terrain. I’m not interested in printing off new tiles, just walls, so the Warlayer set was the obvious choice. That was dumb. I should have considered Dragon’s Rest, which costs more but I think is a lot better looking and, while $19 is 4x as much as Warlayer’s $5, it’s hardly crippling. Didn’t think of it until I was 80% towards being done printing off the Warlayer, though, so I’d gone too far to change it up.
In working with these STLs, though, I’ve run into a couple of things that I figured I’d talk through. It’s fine: I spent $5 on them, that they require a little work isn’t the end of the world, and ultimately they’ll work out OK.
First off, after printing off about 1-2 of each piece, I decided only cared about the 2-square walls, 1-square walls, and the 4-way intersections. Those three shapes cover every variation on the tiles. The 3-way and 2-way intersections don’t fill the negative space on the tiles the way I’d like.
Secondly, they’re the wrong size. Ugh.
Look at these two pieces below: the one on the left is the default size: note that it hews perfectly to the squares… except the board has other spaces between the squares, which means the default size doesn’t actually fit the grid worth a damn. The one on the right is resized: I literally measured the size of the tile, divided it by 6, and resized the pieces around that.
The tiles are 289mm square, 6×6 square. That means each real square is actually 48.16mm square, not the 43.20mm it first appears. That adds up to a pretty substantial difference as you line these pieces across the tile.
So, I uploaded them to TinkerCAD and resized them. I probably could have done this in the slicer but I wanted to be able to make sure I knew what I was doing and that things lined up and such. In addition to lengthening all the pieces, I also had to widen them because those quad-intersection pieces were resized along both axes.
I also counted up how many of each were needed to cover each tile. Conveniently, the tiles are basically the same on both sides. I’m planning on using the walls and barricades that were included in Underhive, so I didn’t include printed replacements for them in my count. Were I to do so: +4x 2 square walls, +1x door, +2x figure something out for the 1 square-sized doors. I’m doing a few of the open window variants, because they’re there, and a few doors because why not. 6/26: I guess all of things I thought were plastic walls are actually supposed to be doors. That makes it easier. Still no good solution for the 1 square wide doors; I could muddle through something but it’d definitely be more work than I’m willing to put in.
6/26: I also realized I was very dissatisfied with how the duct tiles worked with the printed terrain. That was something easily fixed: I threw an 18-ish mm octagon across a 1 square wall. Took a little fiddling to get it looking right.
Shape
Original LxW
Resized LxW
# Needed
2 square Wall
88.19mm x 35.27mm
96.33mm x 39.35mm
12
1 square Wall
43.12mm x 35.27mm
48.16mm x 39.35mm
23
duct wall
48.16mm x 39.35mm
5
4-way Intersection
43.20mm x 43.20mm
48.16mm x 48.16mm
26
Door
76.26mm x 13.33mm
83.30mm x 14.87mm
5
Table of shapes, original sizes, resized sizes, and quantity needed.
At these sizes, they fit perfectly.
Let me tell you how I screwed up magnetization.
These pieces come with 4 magnet holes 3mm across, 2mm deep at every connection point. The resizing did distort these by a smidge: they’re maybe 9% larger in one dimension? So, maybe a 3mm x 3.27mm oval and not an even 3mm circle, but I don’t think it’s noticeable.
I magnetized them, basically with a polarity: each piece goes one way. That way, I never end up with a piece that has positives facing out or negatives facing out. I can always line them up in a row.
For the intersections, I did the same thing:
I got about halfway through when I realized: this will work but it’s definitely not the smart way to do it. A better way would to have done the left side of each contact with one polarity and the right side with a different polarity.
This would mean that, instead of every piece having a correct contact direction, every contact direction would work. I was way too far along in the process before I realized this, though, so I’m pretty stuck.
I’m almost done printing these out.
I’ll probably do a very quick paintjob on them: I don’t think they’ll look great but they’ll look alright. This was a test piece done in a few minutes: primed white, Vallejo Air Hull Red, Vallejo Air Orange, GW Leadbelcher sponged on. I’ve got some red filler primer that’s pretty close to that Hull Red color, so I need to experiment a bit more with that before I do everything.
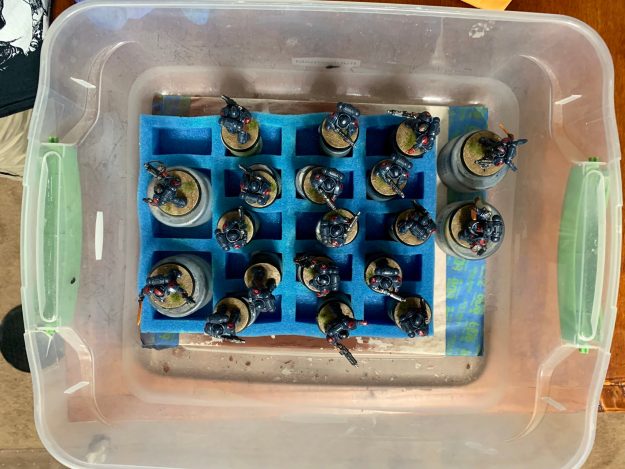
I’ve been frustrated by how to manage my silhouette markers. I’ve got the old Warsenal double-sided ones, stuffed in an empty plastic card box. The S4/S7 marker has some weak magnets in the base and marker component because together it’s just too big to conveniently pack away. I’d considered going back and doing the same to the rest of the markers, decided I’d rather do it with fresh ones, realized Warsenal doesn’t sell the double-sided ones any more, and gave up on that idea.
So, over the weekend, I got into TinkerCAD and worked out a set of markers that could fit into each other to minimize the hassle.
Started out by clustering them into base sizes and considering the volume of the “smaller” sizes as constituent parts of the “larger” ones.
The core idea was that if I wanted an S1, for example, I’d use the S1. If I wanted an S2, I’d flip the 25mm tall S1 marker over and stack the 15mm S2 marker onto it, producing the 40mm tall volume the S2 requires.
Then, assuming they’re hollow (for the smaller sizes to fit in), I iterated over a couple of wall widths that would be sturdy enough but also allow for the smaller base sizes to fit inside. Settled on 4mm wide, but with a 3mm deep x 2mm wide lip. The bottom/top of each was also 3mm, except for the top of the S5, which had to have an additional ring to accommodate the S6 marker. When in doubt, I erred on the side of thickness.
I could have shaved the internal volume of the S5 a bit more aggressively, maybe, but to no point. Although the only wonky thing is that the S1+S2 markers don’t fit perfectly into the S3+S5, there’s no way I could have gotten them to fit perfectly: the base and top would have had to be 2.5mm thick on the S3 & S5, and I think it would have been too risky for the S5. Everything overall does fit into the S4+S7, though, which was the whole point of the exercise.
The same conversation has come up on WGC Infinity at least three times in the past month. It’s apparently a squirrelier subject than it should be. I get it: the first time it came up, I thought, “That’s wrong and BS!” until the rule was pointed out to me and now I get it.
I don’t especially like the rule, but the rule is the rule, and it’s unambiguous.
Specifically, there are several scenarios win which Model A might be in Model B’s front arc, but Model B cannot draw LoF to Model A from their front arc due to terrain.
This boils down to positioning, but gets trickier when it comes to elevation or, more easily, Super-Jump, where a player can say, “I’m Jumping just high enough to only draw LoF to the back half of your volume.”
This really seems to drive people over a cliff. Uncharitable character judgments are being made, posturing about how they’d never play someone again, etc… and I think it’s unreasonable: one of the great things about Infinity is there isn’t really RAI, just RAW. That RAW might be a little tortured, but it’s rarely ambiguous.
It’s frustrating that it’s come up so many times, and people get really worked up over it, so I threw together some diagrams that might help. It won’t, but I can hope.
The key rule to this is from the first FAQ on the Line of Fire entry: “In summary: For a miniature can ARO must be within its 180˚ front half base and be able to draw the LoF from those 180˚.”
The standard move in Infinity is to place your model facing directly at the wall in front of them, perfectly parallel to it: that way, if someone comes around either side, they’ll be in their front arc. This means that the back half of the volume of the silhouette is exposed from above.
If the model rotate’s 90˚, they can cover one direction and be protected from above… but leave the other direction exposed. I don’t think that’s a bad thing: the idea of a perfect defense doesn’t feel right in Infinity. You have to make choices, take risks.
My Dark Age St. Isaac models from a little while back are going up on raffle for the NOVA Open Charitable Foundation, benefiting Doctors Without Borders.
I posted about making Tokens a couple of weeks back: the ultimate motivator for that was someone posting about making a bunch of custom Metachemistry tokens for their Morlocks (I wish I could find the post, but I can’t).
They were cool.
But. There are 17 different options across the two MetaChemistry charts (12 & 5, respectively), and buddy Morlocks are AVA Total. If you want to do the same thing for Booty, you’re looking at 35 different options across the two Booty charts (17 & 18, respectively).
That’s too many flipping tokens to cart around for one model, never mind something I might take 2 or more of.
Solution (and maybe reference that Token post if you need to):
When you make your MetaChemistry or Booty roll, use a wet-erase marker to scribble what the result is on the laminated token.
Done.
This way, instead of having to keep 85 tokens in your token case because you’re running a handful of Morlocks, you just need to keep the 5.
If you’re really sassy, actually make tokens that say “Booty” and “MetaChemistry” on the one side, laminate that, and cover the fancy side with the bottlecap sticker and write on the backside of it.
Dark Age doesn’t require as many tokens as Infinity does, but it does require kind of a lot of them. The nicest ones I’ve seen come from Terracutter, in Russia. I’ve yet to really get my money’s worth out of my Dark Age figures, if you know what I mean, so I’m not about to take on those shipping costs.
Not a problem: I created my own with just a little work. (Nothing here is likely new if you play Infinity but… you never know.)
I play Infinity, and in addition to a number of manufacturers (my preferred is Warsenal) who make tokens that range from OK to gorgeous, the classic go-to is the Infinity Marker Sheet Creator. You select the tokens you need, the size you need them in, and the size paper you’ll be printing (A4 != letter), click Submit, and it spits out a PDF you can print and cut the tokens out of. (So far as I know it’s kept quietly up-to-date; it’s got logos for NA2 and Druze Bayram.)
While the IMSC doesn’t generate tokens for anything non-Infinity: I have access to Visio. Generate a bunch of 25mm circles, fill them with the content you want, and print them out, and you’re in the same spot. (As I typed this up, I realized that I need to give this a try with LibreOffice Draw, just to see it work. I’d be surprised if it didn’t.)
To do this yourself:
Drag in a 25mm or 1″ circle.
Give it a 1pt line around the end.
Fill it Solid or Gradient with whatever colors that make you happy.
Add a Text element if you want text. Make it white, so you can see it on the color fill of your circle. Give it a drop shadow; why not? Drag it into the circle and arrange to taste.
Go to Game-Icons.net, look around for an appropriate Icon.
Download it white on transparent background.
Drag it into the Visio. Give it a drop shadow so it stands out and you can find it against the white background. Resize and arrange it to taste in the circle.
Group ’em if you want.
Repeat, with variations until you’ve got all the tokens you need created.
Align those suckers. Have some self-respect.
It’ll look like this:
PROTIP: if you’re gonna share things that use those icons around, don’t forget there’s a CC license you need to reference.
Have your tokens printed at Kinko’s in color at the highest quality and on a heavy stock paper. You can print them at home (I did), but the colors simply won’t be as vibrant. Also, if you print them on just regular paper, the punch will have trouble cleanly punching through the thin paper and you’ll end up with mangled paper edges that look awful; to mitigate this, you’ll have to punch through your token AND an index card at the same time. That’s a pain.
Buy a craft circle punch. Get a 1″ punch like this one for 25mm/1″ tokens. If you need 40mm tokens, for whatever reason, get a 1.5″ punch like this one: the difference between 40mm and 1.5″ is more significant than the difference between 25mm and 1″, but it’s Close Enough.
Cut your sheet into strips so you can get the punch lined up, and punch out your tokens.
Now, having punched out your tokens, you’ve got a choice to make:
Option 1: use some clear 1″ bottlecap jewelry stickers like these, and you’re done. These run 200 of them for less than $10, so this is very inexpensive. Just peel the sticker off the sheet, press it and your token together, and that’s it. They make these in 1.5″, too, if you want to do some larger tokens, but they’re less inexpensive.
Option 2: use some clear, 1″ acrylic disks like these (I use 1/8″ thick, instead of 1/16″). (If you shop with Soto, the coupon code TNK15OFF should be good for a 15% discount.) Brush Mod Podge onto the back of the disk, stick your paper token printed side against the glue, and smooth it out so there’s very little glue between the paper and the disk. If you want, brush some thinned Mod Podge against the back of the token. Once everything’s dry, scratch off or carefully take a little rubbing alchohol to the front of the token where you’ve clumsily gotten glue fingerprints on it.
I’ve done both ways. In general, I prefer the acrylic disks. I think they look nicer, and they’re much easier for me to handle. Unfortunately, they also require quite a bit more work, and cost about 6.4x as much. So: while I made my Infinity tokens with the acrylic disks, the Dark Age tokens I just knocked out got the sticker treatment.
Here’s a comparison photo:
Left – Punched out from an Infinity box, bottlecap sticker
Center – Printed out, clear acrylic disk
Right – Warsenal full-color acrylic token
So, maybe not as nice as the Warsenal tokens, but definitely good enough.